Showing posts with label Hackaday. Show all posts

Friday, 13 November 2020

Robotics Club Teaches Soldering

Oregon State University must be a pretty good place to go to school if you want to hack on robots. Their robotics club, which looks active and impressive, has a multi-part video series on how to solder surface mount components that is worth watching. [Anthony] is the team lead for their Mars Rover team and he does the job with some pretty standard-looking tools.

The soldering station in use is a sub-$100 Aoyue with both a regular iron and hot air. There’s also a cheap USB microscope that looks like it has a screen, but is covered in blue tape to hold it to an optical microscope. So no exotic tools that you’d need a university affiliation to match.

We agree with [Anthony’s] order of parts. He does components that only have bottom pads first. Then he does the remaining difficult multi-lead components followed by the passives. However, for learning, it would probably be best to get used to soldering some easy components first.

He uses hot air to do the components with bottom-only pads. This is a great way to do it, although we’ve sometimes used nearby pads to inject heat under a part when we didn’t have hot air handy or were too lazy to use it. [Anthony’s] method is to tin the pads and then remove most of it with solder wick. He uses some extra solder to the wick to prime it, although we often use flux for the same reason. He uses the hot air gun but not solder paste, so you don’t have to worry about storing paste to use these techniques.

Doing these parts first makes it easier to control the hot air flow since you don’t have to worry about dislodging other nearby parts you haven’t placed yet. He doesn’t use hot air for the other components that have exposed leads.

Even if you’ve done a lot of SMD soldering, you can always pick up new tips and tricks. There’s lots of flux, of course, and careful alignment before you secure the component down. We know the feeling of leaving a bad solder joint long enough to go secure the other pads and then cleaning it up at the end.

We figure [Anthony] might do well at our annual SMD Challenge although we admit using our tools is what makes it a challenge. Of course, the big trick isn’t always building something new with surface mount components. It is repairing them.


from Hackaday https://ift.tt/3nlFvgj

Thursday, 12 November 2020

Bringing An IBM Model F Into 2020

We know that the Hackaday family includes many enthusiasts for quality keyboards, and thus mention of the fabled ‘boards of yore such as the IBM Model F is sure to set a few pulses racing. Few of us are as lucky as [Brennon], who received the familial IBM PC-XT complete with its sought-after keyboard.

This Model F has a manufacture date in March 1983, and as a testament to its sturdy design was still in one piece with working electronics. It was however in an extremely grimy condition that necessitated a teardown and deep clean. Thus we are lucky enough to get a peek inside, and see just how much heavy engineering went into the construction of an IBM keyboard before the days of the feather-light membrane devices that so many of us use today. There follows a tale of deep cleaning, with a Dremel and brush, and then a liberal application of Goo Gone. The keycaps had a long bath in soapy water to remove the grime, and we’re advised to more thoroughly dry them should we ever try this as some remaining water deep inside them caused corrosion on some of the springs.

The PC-XT interface is now so ancient as to have very little readily available in the way of adapters, so at first a PS/2 adapter was used along with a USB to PS/2 converter. Finally though a dedicated PC-XT to USB converter was procured, allowing easy typing on a modern computer.

This isn’t our first look at the Model F, but if you can’t afford a mechanical keyboard don’t worry. Simply download a piece of software that emulates the sound of one.


from Hackaday https://ift.tt/3eWbSzd

Wednesday, 11 November 2020

Rotary Plotter Draws On Bottles

A pen plotter is often the first experience many ambitious makers have of the world of Computer Numerical Control, or CNC. While they typically operate on flat stock, with the right build, they can be designed to draw on curved surfaces, too – as [tuenhidiy] demonstrates with this rotary bottle plotter.

The plotter uses shafts salvaged from an old printer to act as the rollers for the bottle to be drawn upon, turned by a pair of stepper motors. X and Z axes are created out of two CD drive mechanisms – a popular way to build two linear axes on the cheap. The hardware is controlled by GRBL, running on an Arduino Uno kitted out with a CNC shield to handle the necessary I/O.

The build is somewhat limited to by the short range of its X axis, which prevents the plotter from easily drawing on a full-size bottle label or can. However, this could easily be fixed with some upgrades and extra steppers if so desired. As a home build, it’s a great way to learn about the CNC techniques required to work with curved surfaces effectively. Video after the break.


from Hackaday https://ift.tt/3lpjQmG

Monday, 9 November 2020

Hello From The NearSpace

A key challenge for any system headed up into the upper-atmosphere region sometimes called near space is communicating back down to the ground. The sensors and cameras onboard many high altitude balloons and satellites aren’t useful if the data they collect can’t be retrieved. Often times, custom antennas or beacons are added to help. Looking at the cost and difficulty of the problem, [arko] and [upaut] teamed up to try and make a turn-key solution for any near-space enthusiast by building CUBEX, a wonderful little module with sensors and clever radio that can be easily reused and repurposed.

CUBEX is meant as a payload for a high-altitude balloon with a camera, GPS, small battery, solar cell, and the accompanying power management circuits. The clever bit comes in the radio back down. By using the 434.460 Mhz band, it can broadcast around a hundred miles at 10mW. The only hardware to receive is a radio listener (a cheap RTL USB stick works nicely). Pictures and GPS coordinates stream down at 300 baud.

Their launch was quite successful and while they didn’t catch a solar eclipse, their balloon reached an impressive 33698m (110,560ft) while taking pictures. Even though it did eventually splashdown in the Pacific Ocean, they were able to enjoy a plethora of gorgeous photos thanks to their easy and cost-effective data link.


from Hackaday https://ift.tt/3levUqU

Sunday, 8 November 2020

Hackaday Links: November 8, 2020

Saturday, November 7, 2020 – NOT PASADENA. Remoticon, the virtual version of the annual Hackaday Superconference forced upon us by 2020, the year that keeps on giving, is in full swing. As I write this, Kipp Bradford is giving one of the two keynote addresses, and last night was the Bring a Hack virtual session, which I was unable to attend but seems to have been very popular, at least from the response to it. In about an hour, I’m going to participate in the SMD Soldering Challenge on the Hackaday writing crew team, and later on, I’ll be emceeing a couple of workshops. And I’ll be doing all of it while sitting in my workshop/office here in North Idaho.

Would I rather be in Pasadena? Yeah, probably — last year, Supercon was a great experience, and it would have been fun to get together again and see everyone. But here we are, and I think we’ve all got to tip our hacker hats to the Remoticon organizers, for figuring out how to translate the in-person conference experience to the virtual space as well as they have.

The impact of going to a museum and standing in the presence of a piece of art or a historic artifact is hard to overstate. I once went to an exhibit of artifacts from Pompeii, and was absolutely floored to gaze upon a 2,000-year-old loaf of bread that was preserved by the volcanic eruption of 79 AD. But not everyone can get to see such treasures, which is why Scan the World was started. The project aims to collect 3D scans of all kinds of art and artifacts so that people can potentially print them for study. Their collection is huge and seems to concentrate on classic sculptures — Michelangelo’s David is there, as are the Venus de Milo, the Pieta, and Rodin’s Thinker. But there are examples from architecture, anatomy, and history. The collection seems worth browsing through and worth contributing to if you’re so inclined.

For all the turmoil COVID-19 has caused, it has opened up some interesting educational opportunities that probably wouldn’t ever have been available in the Before Time. One such opportunity is an undergraduate-level course in radio communications being offered on the SDRPlay YouTube channel. The content was created in partnership with the Sapienza University of Rome. It’s not entirely clear who this course is open to, but the course was originally designed for third-year undergrads, and the SDRPlay Educators Program is open to anyone in academia, so we’d imagine you’d need some kind of academic affiliation to qualify. The best bet might be to check out the intro video on the SDRPlay Educator channel and plan to attend the webinar scheduled for November 19 at 1300 UTC. You could also plan to drop into the Learning SDR and DSP Hack Chat on Wednesday at noon Pacific, too — that’s open to everyone, just like every Hack Chat is.

And finally, as if bald men didn’t suffer enough disrespect already, now artificial intelligence is having a go at them. At a recent soccer match in Scotland, an AI-powered automatic camera system consistently interpreted an official’s glabrous pate as the soccer ball. The system is supposed to keep the camera trained on the action by recognizing the ball as it’s being moved around the field. Sadly, the linesman in this game drew the attention of the system quite frequently, causing viewers to miss some of the real action. Not that what officials do during sporting events isn’t important, of course, but it’s generally not what viewers want to see. The company, an outfit called Pixellot, knows about the problem and is working on a solution. Here’s hoping the same problem doesn’t crop up on American football. Check out the video after the break.


from Hackaday https://ift.tt/3eGWF4I

Saturday, 7 November 2020

One Wheel Is All We Need To Roll Into Better Multirotor Efficiency

Multirotor aircraft enjoy many intrinsic advantages, but as machines that fight gravity with brute force, energy efficiency is not considered among them. In the interest of stretching range, several air-ground hybrid designs have been explored. Flying cars, basically, to run on the ground when it isn’t strictly necessary to be airborne. But they all share the same challenge: components that make a car work well on the ground are range-sapping dead weight while in the air. [Youming Qin et al.] explored cutting that dead weight as much as possible and came up with Hybrid Aerial-Ground Locomotion with a Single Passive Wheel.

As the paper’s title made clear, they went full minimalist with this design. Gone are the driveshaft, brakes, steering, even other wheels. All that remained is a single unpowered wheel bolted to the bottom of their dual-rotor flying machine. Minimizing the impact on flight characteristics is great, but how would that work on the ground? As a tradeoff, these rotors have to keep spinning even while in “ground mode”. They are responsible for keeping the machine upright, and they also have to handle tasks like steering. These and other control algorithm problems had to be sorted out before evaluating whether such a compromised ground vehicle is worth the trouble.

Happily, the result is a resounding “yes”. Even though the rotors have to continue running to do different jobs while on the ground, that was still far less effort than hovering in the air. Power consumption measurements indicate savings of up to 77%, and there are a lot of potential venues for tuning still awaiting future exploration. Among them is to better understand interaction with ground effect, which is something we’ve seen enable novel designs. This isn’t exactly the flying car we were promised, but its development will still be interesting to watch among all the other neat ideas under development to keep multirotors in the air longer.

[IROS 2020 Presentation video (duration 10:49) requires no-cost registration, available until at least Nov. 25th 2020. Forty-two second summary embedded below]


from Hackaday https://ift.tt/3n4lWJm

Friday, 6 November 2020

Gorgeous Perfboard Build Puts 1-Bit Controller Back to Work

Eight-bit computers are all the retro rage these days, with people rushing to build computers either from chips like the 6502 or the Z80, or even recreating these chips from a collection of TTL logic chips. And while we respect and covet those builds immensely, 8-bit computers aren’t the only game going on. To wit we present this lovely single-board computer sporting a 1-bit CPU.

The machine, which creator [Simon Boak] cheekily dubs “the world’s least-powerful computer,” is based on the Motorola MC14500B, a chip from the 1970s that was aimed at the industrial controls market. There, the chip’s limited instruction set and narrow bus width were not as limiting as they would be in a general-purpose computer. In fact, since the chip requires an external program counter, it offers a great degree of design flexibility. [Simon] chose a 4-bit address space, but with a little wizardry he was able to get eight bits of input in the form of DIP switches and eight bits of output LEDs. It’s not good for much past making lights blink, but it does that with nary an Arduino in view — although it does sport a couple of 555s.

[Simon]’s goal for the build was simply to build cool from an unusual chip, and we think he succeeded. In fact, we can’t recall seeing a neater perfboard build — it’s almost to the level of circuit sculpture. We especially like the hybrid solder and wirewrap construction. We’ve seen builds based on this chip before, but never one so neat and attractive.

[via r/electronics]


from Hackaday https://ift.tt/3n6riE1

Thursday, 5 November 2020

Open Source Lego Controller

A mechanical and manufacturing engineer by day, [Tyler Collins] taught himself electronics and firmware development in his spare time and created an open source Lego controller called Evlōno One. It is based on the STM32 and Arduino ecosystems, and compatible with a impressive variety of existing Lego controllers, sensors and actuators. [Tyler] encountered Lego Mindstorms while helping in an after-school program, and got to wondering whether he could make a more flexible controller. We’d have to say he succeeded, and it’s amazing how much he has packed into this 4 x 4 single-height brick format.

The Evlōno One is based on an ESP32 dual-core MCU, and has WiFi, Bluetooth, and an IR transmitter for wireless connectivity. It also boasts USB-C power delivery, three motor controllers, speakers, LEDs and a button. Dig through the Kickstarted page for more details on these interfaces and specifications. Both the firmware and the hardware will be published as open source on GitHub.

Although [Tyler] has the prototypes all running, he notes this is his first big production effort. FCC certification testing and production mold tooling are the two biggest items driving the scheduled Feb 2021 shipments. If computer driven Lego modeling is one of your hobbies, definitely check out [Tyler]’s project. And if you missed our [Daniel Pikora]’s FOSSCON 2018 presentation about the intersection (collision) of Legos and Open Source, our article must-read for you folks in the Adult Fan of Lego (AFOL) community.


from Hackaday https://ift.tt/2Ubof0V

Wednesday, 4 November 2020

3D Printed Workshop Lamp Uses A Few Neat Tricks

As far as light fittings go, store bought is fine, but it’s hard to beat something you’ve built yourself from the ground up. [Heliox] demonstrates this well, with a 3D-printed workshop lamp that looks the business and is functional, too.

The lamp has plenty of neat design touches that speak to [Heliox]’s experience in the 3D printed arts. The articulating arms are modular, and feature integrated cable guides. The lamp base features nuts inserted mid-print for easy assembly, and the swivel is actually a two-piece mechanism printed as a single assembly. The table clamp uses a large screw, and the benefit of 3D printing means its easy to customise to suit any individual table. Using black and orange filaments gives the lamp a proper industrial look, and the bright LED strips are perfect for illuminating a bench for fine detailed work.

It’s a great addition to [Heliox]’s workspace, and the tall articulated design means it can cast light without getting in the way of what you’re doing. We’ve featured her work before, too – like this glorious infinity cube. Video after the break.


from Hackaday https://ift.tt/3kXHBCo

Monday, 2 November 2020

Building A Top-Notch Electret Microphone

Electret microphones are capable of high-quality output, and are prized for their smooth frequency response. However, unlike other types, they can’t simply be plugged directly into a mixing desk. Instead, they require special high-impedence circuitry to extract the audio signal for recording. [DJJules] is a big fan of these microphones, and decided to build a high-quality, easy to use circuit that he has shared with the community. 

The goal of the project was to create a circuit to match the TSB2555B electret capsule that could be used with phantom power, and that could be built with easily obtainable parts. [DJJules] had used FETs in the past, but grew tired of routinely having to hunt for obsolete parts. Instead, this design relies on a dual OPA1642 op-amp, with its low quiescent current meaning it’s perfect for running off phantom power. This means the microphone needs no batteries, and using a dual op-amp enables the circuit to properly drive a balanced audio connection.

The circuit is designed to fit inside a common BM700 or BM800 microphone body, and the PCB can be ordered from PCBWay for those interested in building their own. There’s also a saddle on Shapeways that’s designed to neatly mount the electret capsule within the housing.

The final results are impressive, and this project would make a great entry into the DIY microphone space for anyone eager to start building their own gear. Of course, there are simpler builds if you’re looking for an easier way to get started. Video after the break.


from Hackaday https://ift.tt/36298fu

Sunday, 1 November 2020

Hackaday Links: November 1, 2020

We normally chuckle at high-profile auctions where people compete to pay as much as possible for items they clearly don’t need. It’s easy to laugh when the items on the block are things like paint-spattered canvases, but every once in a while some genuine bit of history that really piques our interest goes on sale. Such is the case with what is claimed to be an original Steve Wozniak-built Blue Box, going on sale November 5. The prospectus has an excellent summary of the history of the “Two Steves” and their early business venture making and selling these devices to Berkeley students eager to make free long distance phone calls. The item on sale is a very early rev, most likely assembled by Woz himself. The current owner claims to have bought it from Woz himself in the summer of 1972 while on a roadtrip from Sunnyvale to Los Angeles. Estimated to go for $4,000 to $6,000, we really hope this ends up in a museum somewhere — while we’ve seen attempts to recreate Woz’s Blue Box on Hackaday.io, letting a museum study an original would be a great glimpse into our shared technological history.

Not in the market for old tech? No problem — Digilent wants to get rid of 3,000 PCBs, and quickly. They posted the unusual offer on reddit a couple of days ago; it seems they have a huge stock of populated boards for a product that didn’t quite take the market by storm. Their intention is likely not to flood the market with scopes cobbled together from these boards, but rather to make them available to someone doing some kind of art installation or for educational purposes. It’s a nice gesture, and a decent attempt to keep these out of the e-waste stream, so check it out if you have a need.

Speaking of PCBs, SparkFun has just launched an interesting new service: SparkFun À La Carte. The idea is to make it really easy to design and build prototype boards. Instead of using traditional EDA software, users select different blocks from a menu. Select your processor, add components like displays and sensors, and figure out how you want to power it, and SparkFun will do the rest, delivering a fully assembled board in a few weeks. It certainly stands to suck the fun out of the design process while also hoovering up your pocketbook: “A $949 design fee will be applied to all initial orders of a design”. You can get your hands on the design files, but that comes with an extra fee: “they can be purchased separately for $150 by filling out this form”. But for someone who just needs to hammer out a quick design and get on with the next job, this could be a valuable tool.

Another day, another IoT ghost: Reciva Radio is shutting down its internet radio service. A large banner at the top of the page warns that the “website will be withdrawn” on January 31, 2021, but functionality on the site already appears limited. Users of the service are also reporting that their Reciva-compatible radios are refusing to stream content, apparently because they can’t download anything from the service’s back end. This probably doesn’t have a huge impact — I’d never heard of Reciva before — but it makes me look at the Squeezebox radio we’ve got in the kitchen and wonder how long for the world that thing is. It’s not all bad news, though — owners of the bricked radios will now have a great opportunity to hack them back into usefulness.

By the time this article is published, Halloween will be history and the hordes of cosplaying candy-grubbers who served as welcome if ironic respite from this non-stop horror show of a year will be gone. Luckily, though, if it should come to pass that the dead rise from their graves — it’s still 2020, after all — we’ll know exactly how to defeat them with this zombie invasion calculator. You may remember that last year Dominik Czernia did something similar, albeit with vampires. Switching things up from the hemophagic to the cerebrophagic this year, his calculator lets you model different parameters, like undead conversion percentage, zombie demographics, and attack speed. You’ve also got tools for modeling the response of the living to the outbreak, to see how best to fight back. Spoiler alert: everyone will need to bring Tallahassee-level badassery if we’re going to get through this.


from Hackaday https://ift.tt/3eiR2tG

Friday, 30 October 2020

Easy-SDR Gets Updates

Back in 2018, we covered [Igor’s] Easy-SDR project that aimed to provide open hardware extensions for the chap RTL-SDR receivers. If you haven’t been there for a while, it’s worth a look as there have been many recent updates. According to the author’s Reddit post:

  1. Most of the devices are now prepared for installation in a metal case measuring 80 x 50 x 20 millimeters.
  2. There’s a completely redesigned LNA design. Now, Bias Tee powered amplifiers are housed in a 50 x 25 x 25mm metal case and have N-type connectors.
  3. There’s an added amplifier based on the PGA-103 microcircuit.
  4. Added is the ability to install filters in final amplifiers (a separate printed circuit board, depending on the filter used).
  5. A new device – SPDT antenna switch for receiving antennas.
  6. The upconverter has been redesigned. Added intermediate buffer stage between the crystal generator and mixer.
  7. RF lines in all devices were recalculated to correspond to the characteristic wave impedance of 50 Ohm.
  8. Reduced size of PI attenuator PCB.

There is an emphasis on ease of assembly, so the projects generally have a gerber file and can use through hole or surface mount parts. They are also available live on EasyEDA if you want to make changes. Some of the designs, like the new upconverter, are SMD only, but for some devices these days that’s your only choice.

We were impressed with the instructions included with some of the projects. It should be very possible to duplicate these projects with just a little effort. If you missed our first pass at [Igor’s] great repo, you can still catch up. Since he uses EasyEDA, you might want to read our experience with that, too.


from Hackaday https://ift.tt/3kEUAZo

Sunday, 25 October 2020

STM32 Gets Up Close and Personal with Mandelbrot

The Mandelbrot set is a curious mathematical oddity that, while interesting in its own right, is also a useful tool for benchmarking various types of computers. Its constant computing requirement when zooming in and out on the function, combined with the fact that it can be zoomed indefinitely, means that it takes some quality hardware and software to display it properly. [Thanassis] has made this a pet project of his, running Mandelbrot set visualizations in different ways on many different hardware platforms.

This particular one is based on an STM32 board called the Blue Pill, which [Thanassis] chose because he hadn’t yet done a continuous Mandelbrot zoom on a microcontroller yet. The display is handled by a tiny 16K IPS color screen, and some clever memory tricks had to come into play in order to get smooth video output since the STM has only 20 kB available. The integer multiplication is also tricky on a platform this small while keeping the continuous zoom function, so it’s limited to fixed point multiplication.

Even with the limitations of the platform, he is still able to achieve nearly double-digit FPS rates with this one. If you want to play around with graphics like this on an STM platform, [Thanassis] has released all of the source code on his GitHub page, but if you’d like to see more Mandelbrot manipulation you can check out one of his older projects where he built a similar project on an FPGA.


from Hackaday https://ift.tt/34vjt4h

Saturday, 24 October 2020

Radio Remote Control via HTML5

It’s a common scene: a dedicated radio amateur wakes up early in the morning, ambles over to their shack, and sits in the glow of vacuum tubes as they call CQ DX, trying to contact hams in time zones across the world. It’s also a common scene for the same ham to sit in the comfort of their living room, sipping hot chocolate and 
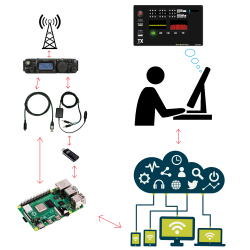
remote-controlling their rig from a laptop. As you can imagine, this essentially involves a server running on a computer hooked up to the radio, which is connected via the internet to a client running on the laptop. [Olivier/ F4HTB] saw a way to improve the process by eliminating the client software and controlling the rig from a web browser.

[Oliver]’s software, aptly named Universal HamRadio Remote, runs a web server that hosts an HTML5 dashboard for controlling the radio. It also pipes audio back and forth (radio control wouldn’t be very useful if you couldn’t talk!), and can be run on a Raspberry Pi. Not only does this make setup easier, as there is no need to configure the client machine, but it also makes the radio accessible from nearly any modern device.

We’ve seen a similar (albeit expensive and closed-source) solution, the MFJ-1234, before, but it’s always refreshing to see the open-source community tackle a problem and make it their own. We can’t wait to see where the project goes next!


from Hackaday https://ift.tt/35z6cqm

Sunday, 18 October 2020

Free P2P VPN

People use a VPN — virtual private network — for a lot of reasons. However, for many people it is synonymous with hiding your network traffic, one thing that VPN can do. FreePN is a relatively new open source project that aims to build a free peer-to-peer VPN network. Like TOR, it is decentralized.

Right now, you can download for Ubuntu and Gentoo. There is a way to ask for early access for Debian, Fedora, and Arch. Windows, iOS, MacOS, and Android versions are promised for the future.

The code is on GitHub, so all questions are in theory answerable. Digging into the fpnd README told us most of the features we hoped to find on the main page (but didn’t):

The FreePN network daemon (fpnd) is a P2P implementation of a distributed virtual private network (dVPN) that creates an anonymous “cloud” of peers where each peer is both a client node and an exit node. Peers are randomly connected on startup and reconnected to new (random) peers as needed.

The FreePN network daemon (fpnd) is a P2P implementation of a distributed virtual private network (dVPN) that creates an anonymous “cloud” of peers where each peer is both a client node and an exit node. Peers are randomly connected on startup and reconnected to new (random) peers as needed.

In addition, the page notes that they only route http(s) traffic and, optionally, DNS traffic. IPv6 packets are dropped, unless you configure it to pass without VPN.

Is this a better answer than TOR? We don’t know. We weren’t clear on how you could set this up for some possible use cases, but there appears to be a fledgling support group on Reddit. If this works well and can support more platforms, it could be a good thing for online privacy and protection.

We’ve noted before that truly secure networking can be hard to accomplish. For many of us, a VPN is just an extra layer of security, or a way to watch TV that is only available in another country. But for some people, a VPN is a political necessity.


from Hackaday https://ift.tt/31jQTR4

Saturday, 17 October 2020

Polymer Networks Make Better 3D Prints

Biological machines such as human and animal bodies are quite incredible. Your body seamlessly incorporates materials as different as muscle, bone, and tendons into an integrated whole. Now Texas A&M researchers think they can imitate nature using polymer networks that have a tunable stiffness. As a bonus, similar to biological devices, the material spontaneously self-heals.

The trick relies on the Diels-Alder reaction which s a cycloaddition reaction of a conjugated diene to an alkene. Diels-Alder-based polymers or DAPs will bond together even when they have different physical characteristics and they undergo a reversible reaction to heat which offers shape-memory and healing capability.

The polymer itakes the form of a liquid, and a Makerbot Replicator 2X fitted with a custom syringe system did the printing. Different syringes with different materials were put in during layer changes. Different polymer crosslinkers produce different physical properties in the cured polymer.

From what we can tell, this is probably not ready for prime time yet. But it does show that we still have a lot to learn on the best materials to use for creating 3D objects via additive manufacturing. We spend a lot of time thinking about 3D printing materials. While we used to do a lot of ABS, PLA is more in vogue, today.


from Hackaday https://ift.tt/3o1W6XO

Wednesday, 14 October 2020

Grab a Stanford Computer Science Education

There are two reasons to go to school: learn about something and to get a coveted piece of paper that helps you get jobs, or at least, job interviews. With so many schools putting material online, you can do the first part without spending much money as long as you don’t expect the school to help you or grant you that piece of paper. Stanford has a huge computer science department and [Rui Ma] cataloged over 150 computer science classes available online in some form from the University. Just the thing to while away time during the quarantine.

Apparently, [Rui] grabbed the 2020 course catalog to find on-campus classes and found the companion website for each class, organizing them for our benefit. The list doesn’t include the actual online class offerings, which you can find directly from Stanford, although there is another list for that.

There are basic classes like CS103, Mathematical Foundations of Computing, that are important to know before attempting some of the upper-level classes. Systems classes range from CS1U on Practical Unix to CS149 and CS315B which cover parallel computing.

If you want to learn more about the theory behind why your LED blink algorithm scales poorly, there’s CS254, Computational Complexity. Machine learning is in vogue right now, and there are plenty of options including CS20, Tensorflow for Deep Learning Research.

There’s more, but we’ll let you read the list. Phone programming, robots, video games, and biocomputing are all on the menu. There are even a few classes on things like personal finance for engineers, ethics, and computer music.

To be fair, not all of these classes are easy to digest on their own. Some of them are supporting material and you really need the professor’s lectures. However, for some classes like CS106L (Standard C++ Programming) you’ll find complete sets of lecture notes and some classes even have video lectures, like the one below from CS224N, Natural Language Processing with Deep Learning.

We were glad [Rui] put together this list. Of course, if you are grabbing university content for self-study, you don’t have to get everything from one place. If you want a very practical education, the Navy’s materials are another source.


from Hackaday https://ift.tt/33XPjWN

Sunday, 11 October 2020

Improved Part Searches for JLCPCB Parts

Finding the JLCPCB component parts library frustrating to navigate, [Jan Mrázek] took matters into his own hands and made an open-source parametric search utility. We’ve all probably wasted time before trying to track down a particular flavor of a part, and this tool promises to make the process easier.  It downloads data from the JLCPCB parts site upon initialization and presents the user with typical selection filters for categories and parameter values. You can install it yourself on GitHub Pages, or [Jan] provides a link to his site.

For the curious, the details of how to pull parts information from the JLBPCB site can be found in the project’s source code.  We like it when a distributor provides this level of access to their part details and parameters, allowing others to sort and filter the parts in ways not originally envisioned by the site design team.  We think this is a win-win situation — distributors can’t sell parts that designers can’t find.

If [Jan]’s name sounds familiar, it should be.  We have written about several of his projects before, two of them are also PCB designer tools ( KiCad Board Renderings and KiCad Panelization ).


from Hackaday https://ift.tt/33Pv8ub

Saturday, 10 October 2020

DIY Braille Embosser is Really Impressive

We weren’t surprised to learn that Braille tools are quite expensive. But it’s interesting to hear that there’s another class of tools altogether, and they are very cheap and imprecise. In devising the Braille Embossing Experience, aka BEE, [alatorre] sought to find an open-source middle ground. We think they succeeded marvelously.

Another surprising thing — while handheld embossers do exist, there is no system for filling out an A4 sheet of paper, say, to write a letter.

For Braille to be readable, the characters and lines must be properly spaced, and this requires some kind of moveable type-like device to correctly register the characters onto paper. BEE fills this void as well. The amazing thing is, there’s not much more to it than a marked-up piece of aluminum and some clever 3D printing.

There are two parts to this system — the positioning rail, which includes a landing box for the embosser with six holes in the bottom. The other part is a pair of embossers, one for letters A-M, and another for letters N-Z. To use BEE, just slide the rail to the right and start embossing letters right to left, then flip the paper over when finished.

Need to create something more permanent? Make a Braille PCB.


from Hackaday https://ift.tt/3lBFJzc

Thursday, 8 October 2020

Current Sensor Makes Intriguing Use of Concrete

Getting a product to market isn’t all about making sure that the product does what it’s supposed to. Granted, most of us will spend most of our time focusing on the functionality of our projects and less on the form, fit, or finish of the final product, especially for one-off builds that won’t get replicated. For those builds that do eventually leave the prototyping phase, though, a lot more effort goes into the final design and “feel” of the product than we might otherwise think. For example, this current sensor improves its feel by making use of cast concrete in its case.

The current sensor in this build is not too much out of the ordinary. [kevarek] built the sensor around the MCA1101-50-3 chip and added some extra features to improve its electrostatic discharge resistance and also to improve its electromagnetic compatibility over and above the recommended datasheet specifications. The custom case is where this one small detail popped out at us that we haven’t really seen much of before, though. [kevarek] mixed up a small batch of concrete to pour into the case simply because it feels better to have a weightier final product.

While he doesn’t mention building this current sensor to sell to a wider audience, this is exactly something that a final marketable product might have within itself to improve the way the device feels. Heavier things are associated, perhaps subconsciously, with higher quality, and since PCBs and plastic casings don’t weigh much on their own many manufacturers will add dummy weights to improve the relationship between weight and quality. Even though this modification is entirely separate from the function of the product, it’s not uncommon for small changes in design to have a measurable impact on performance, even when the original product remains unmodified.

Thanks to [Saabman] for the tip!


from Hackaday https://ift.tt/30M3Jrf

Why are there holiday delay warnings over the EU's new border system?

The EU's much-delayed Entry/Exit System will change the way UK passengers travel to 29 countries. from BBC News https://ift.tt/Siy7EO3